An invoice is a commercial document that itemizes a transaction between seller and buyer. If you wish to create an invoice with GoERPBaby system, then simply click on “Create Invoice” Option available in the drop down list of Sale category.
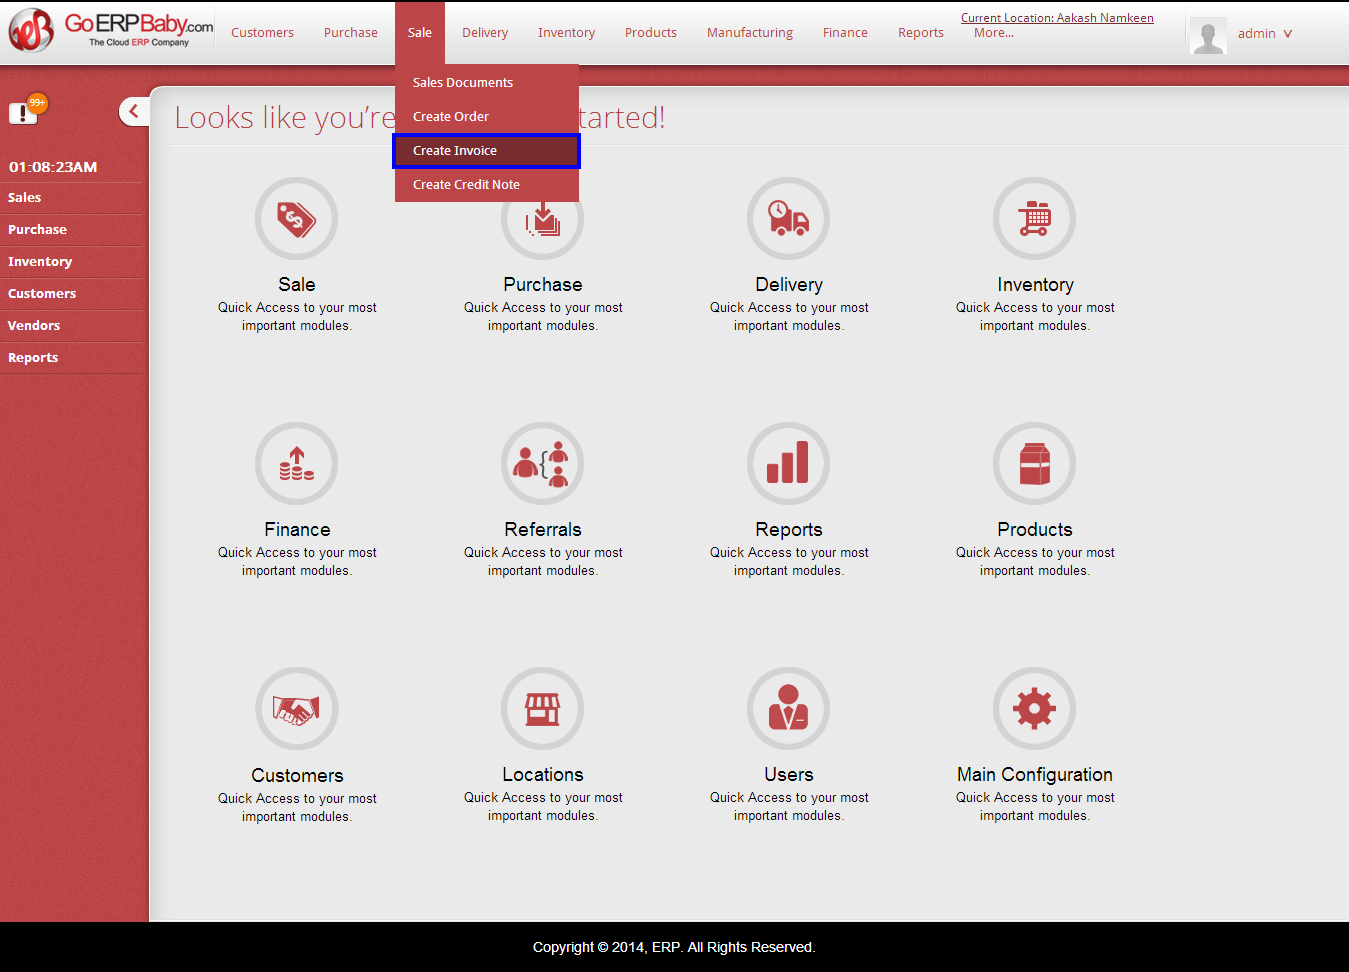
When clicking on “Create Invoice” option, this screen appears that enables you to create new invoice by selecting certain details such as:-
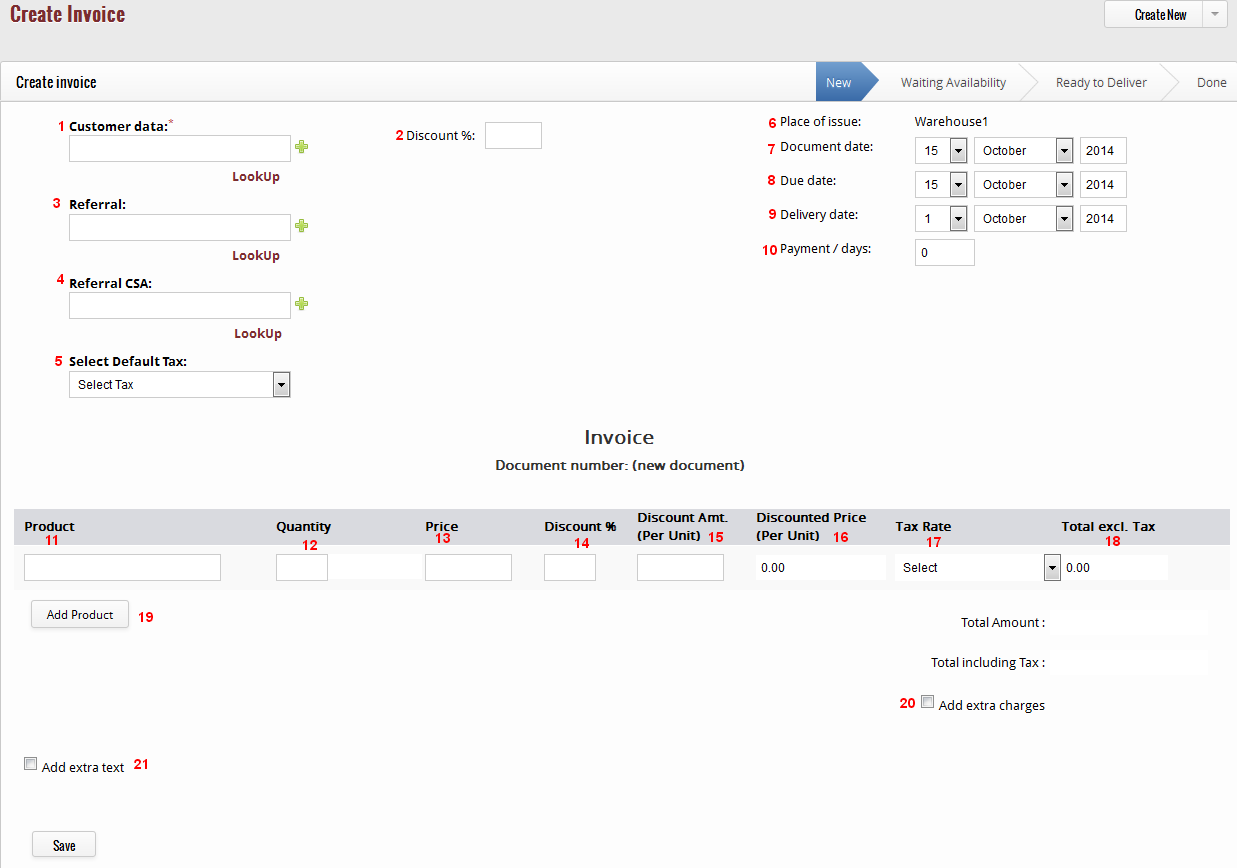
1) Customer Data (required): Option to add active and not deleted customer for the sale order by 3 options
- Autocomplete: Type and search from existing customers and select any one of them.
- Lookup: An popup window appears with list of customers to select any one
- Add new: This option shows form to create new customer and this new created customer fills in customer field.
With customer name we are showing customer’s address, zip, city, state and credit status.
When we select customer one more option appears i.e. Price list Level and this option has selected price list level option which was assigned to the customer at create or edit customer.
(Price list level field show only if configuration setting for “Allow Price List” is checked.)

Customer and price list level can be changed until product not added to the order.
2) Discount % (optional): This discount refers to customer’s discount which was saved at create or edit customer.
3) Referral: You can add referral same as you add customer. All Active and not deleted referrals are available to add.
4) Referral CSA: You can add referral CSA same as you add customer. All Active and not deleted referrals CSA are available to add.
(This field show only if configuration setting for “Allow CSA” is checked.)
5) Select Default Tax (required): All taxes and tax groups are listed here. You have to select any one option before adding products. This default tax or tax group will be applicable to added products until you don’t change product’s tax (field 17).
6) Place of Issue: Place, for the sales order is creating. This picks current location name.
7) Document Date (required): By default this field has todays date. You can changed to the date for which you want to create sales order.
8) Due Date (required): This refers to last date for payment. By default this field has todays date. You can changed it.
9) Delivery Date (required): This refers to delivery date. By default this field has today date. You can changed it.
10) Payment / Days: This field has day count.
Payment days = Delivery date – Due date
Product Grid fields:
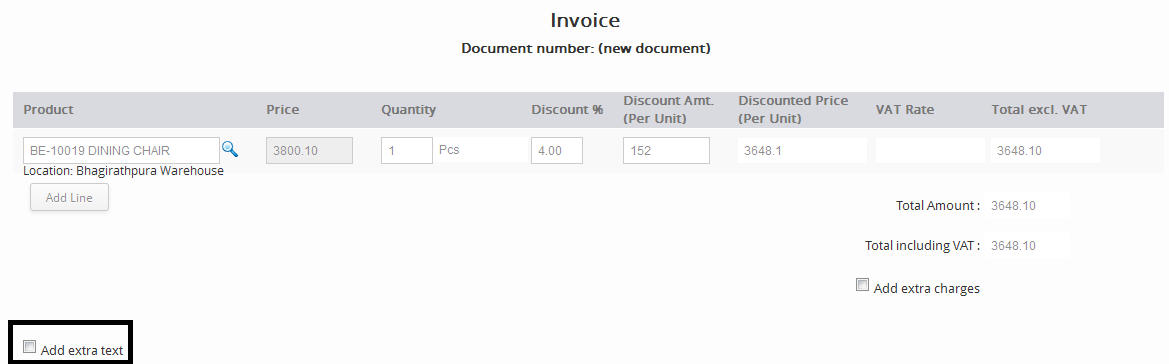
11) Product (required): You can add products (only those that can be sold, active and not deleted) by auto-complete option by typing 3 characters of product. List of 10 matched product appears. This list have only those products that was not added previously.
All product added in grid will be of same type either excisable or not excisable.
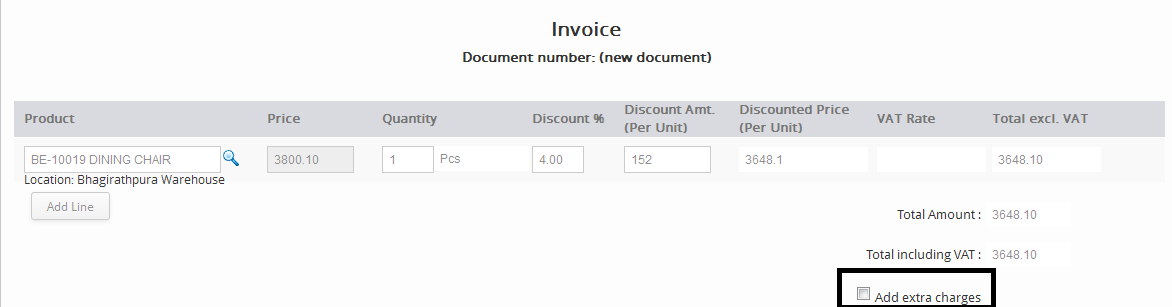
12) Quantity (required): This field fills with product load action and 1 is set as default value. You can edit it. With this field product unit symbol also shows.
13) Price (required): This field show unit price of selected product. There are 2 cases to set price:
- From Price list: If price list level is selected then it will comes from price list of selected level and document date as applicable date. If the price list doesn’t has selected product or for that product price not defined then price will be set to 0. With changing quantity price can be changed according to price list’s quantity ranges.
- Default Price: if no price list level selected then this field has sale price from product’s data.
(Product price can be editable only if configuration setting for “Allow Product Price Editable on Sales” is checked.)
14) Discount % (optional): By default the value is picked from default discount field but if you want to change you can.
15) Discount Amt. (per unit) (optional): You can give discount by amount and discount% is auto calculated by this discount amount. This discount amount is applicable for unit price.
16) Discounted Price (per unit)(required): This is unit price of product after discount.
17) Tax Rate (required): Same as default tax list shows here with selected option from default tax list. You can also change it if you want to add another tax for that product.
18) Total excl Tax: This field show total sale amount for entered product quantity.
Total excl Tax = Discounted Price (per unit) * Quantity
19) Add Product button: This button creates one empty row to add another product same as above row.
If multiple product rows are added then you can deleted any one product row by hitting cross icon.

20) Add Extra Charges (optional): In addition to add the lines, if you want to add some extra charges to the product of the invoice, then click on “Add extra charges” button located at the right hand side corner of the product lines and below the Total Amount.
When you click on “Add extra charges” option, some additional options appear in front of you that facilitates you in adding additional charges to the product.
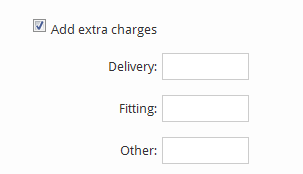
You can add the amount as per your needs in the given charges.
21) Add Extra Text (optional): Other than this, if you want to add some text in the invoice, then click on “Add extra text” available at the left hand corner in the bottom of the page.
After you click on the “Add extra text” option, some new options appears on the page, one option is to select the text template such as foreign tax exemption, payment terms and replacement policy. You can select any one of the following, which you want to add in your invoice. And in another box, you have to write the text about or as per the selected option.

After selecting your desired category, write the text in the box and then click on “Save” button to save the entire things. After you click on “Save” button, an alert message comes that show “Once the invoice has been created it can no longer be changed or deleted. The only possibility for correction will be cancellation of the invoice.”
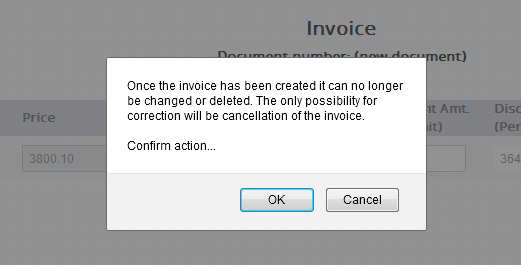
If you are ready to create the invoice, then click on “OK” button, otherwise if you do not want to save the invoice, then click on “Cancel” button.
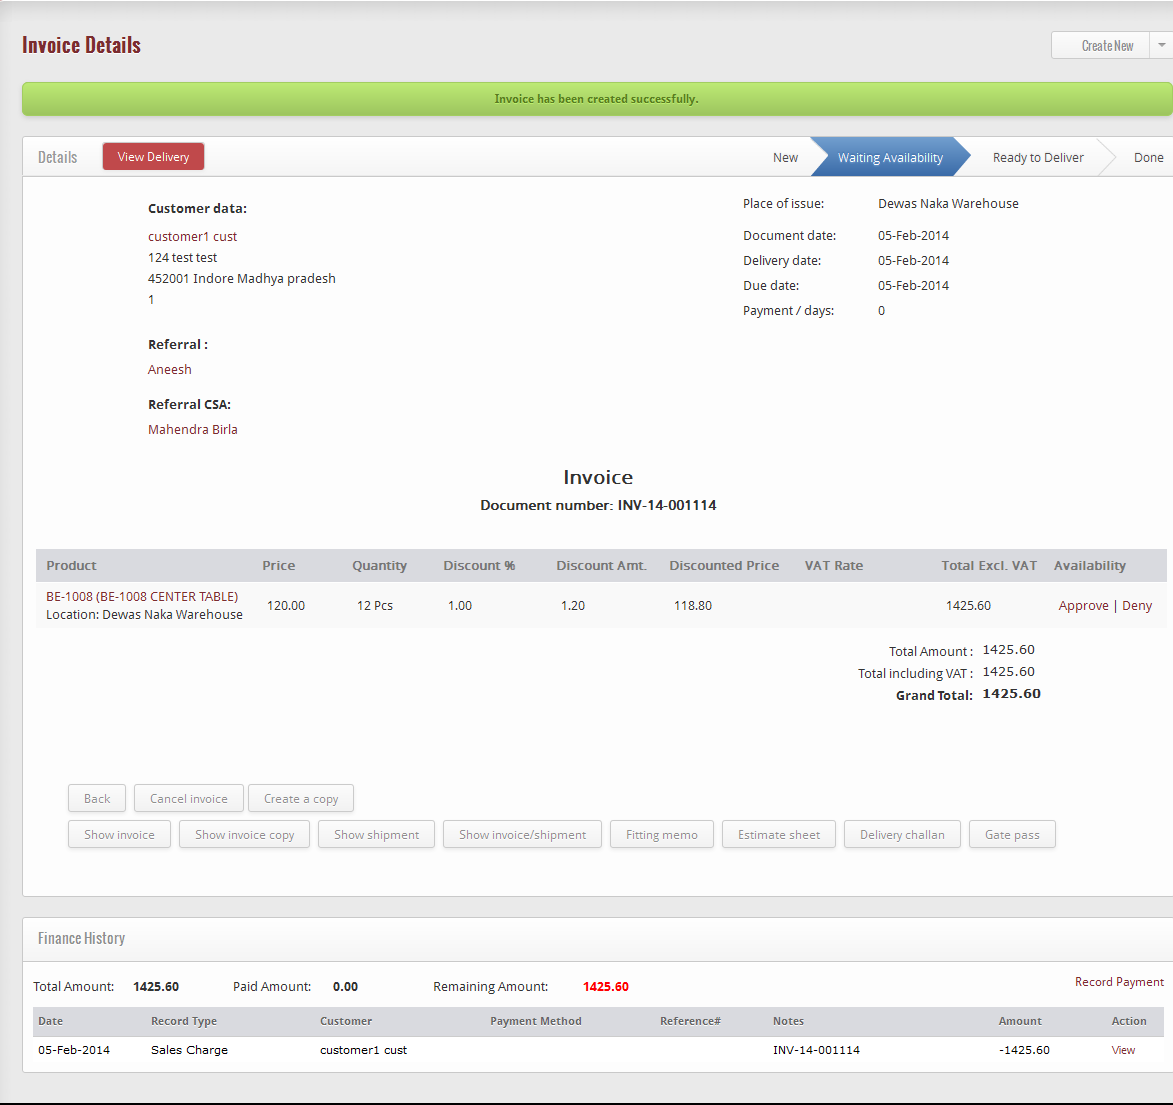
After the invoice has been created, the next step is to approve or deny the availability of product by clicking on “Approve” button or “Deny” button.
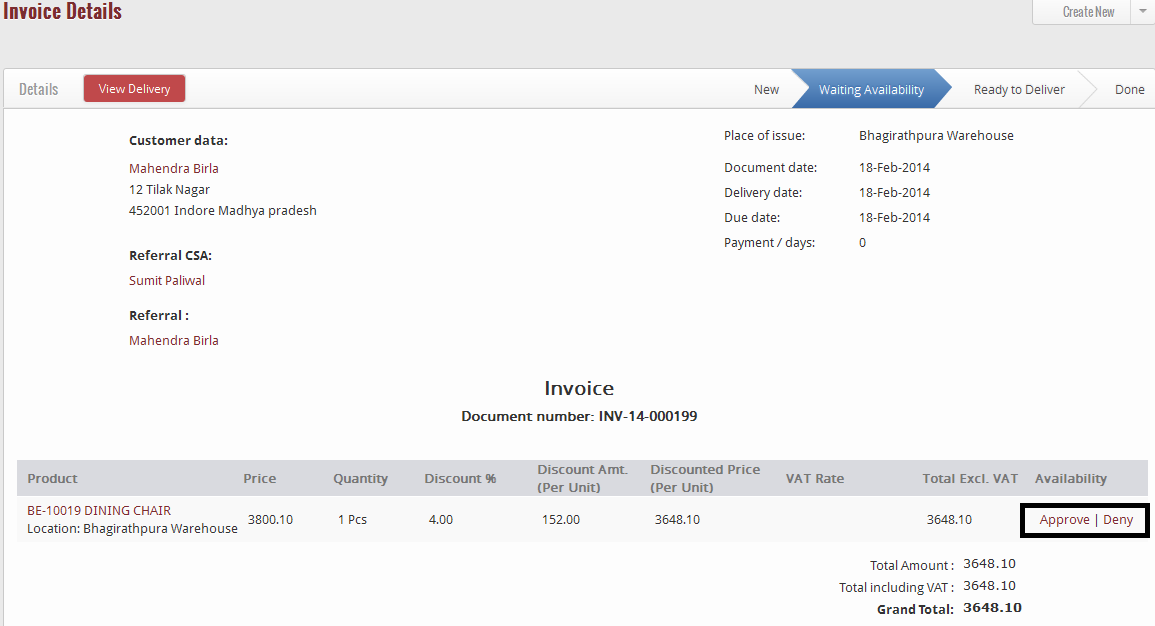
To cancel or deny the availability, click on “Deny” button and for further processing, click on “Approve” button. When you clicked on Approved button, the products are now ready to deliver to the desired customer.
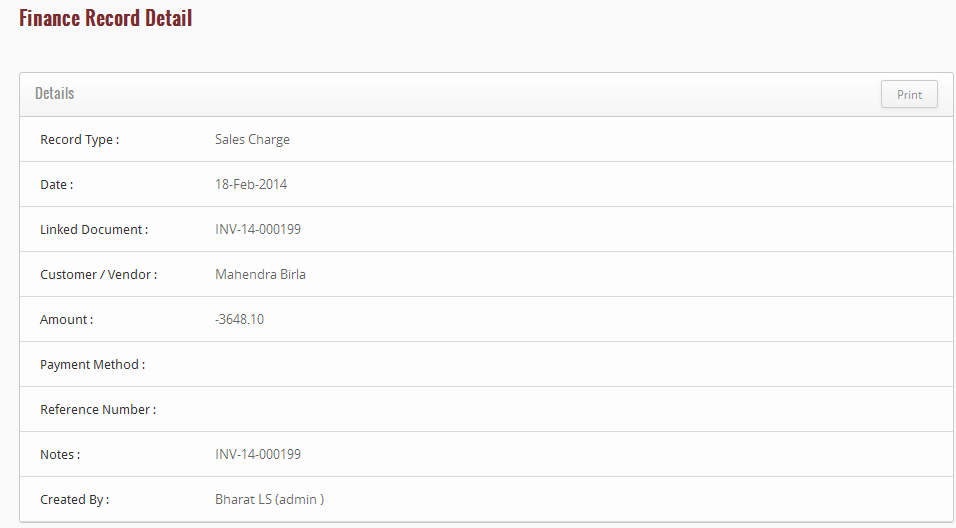
You can log the payment for the sale order or invoice from the record payment option on the document itself
To view the logged payment for the order, click on the “View” Option located at the right hand corner bottom of the page.
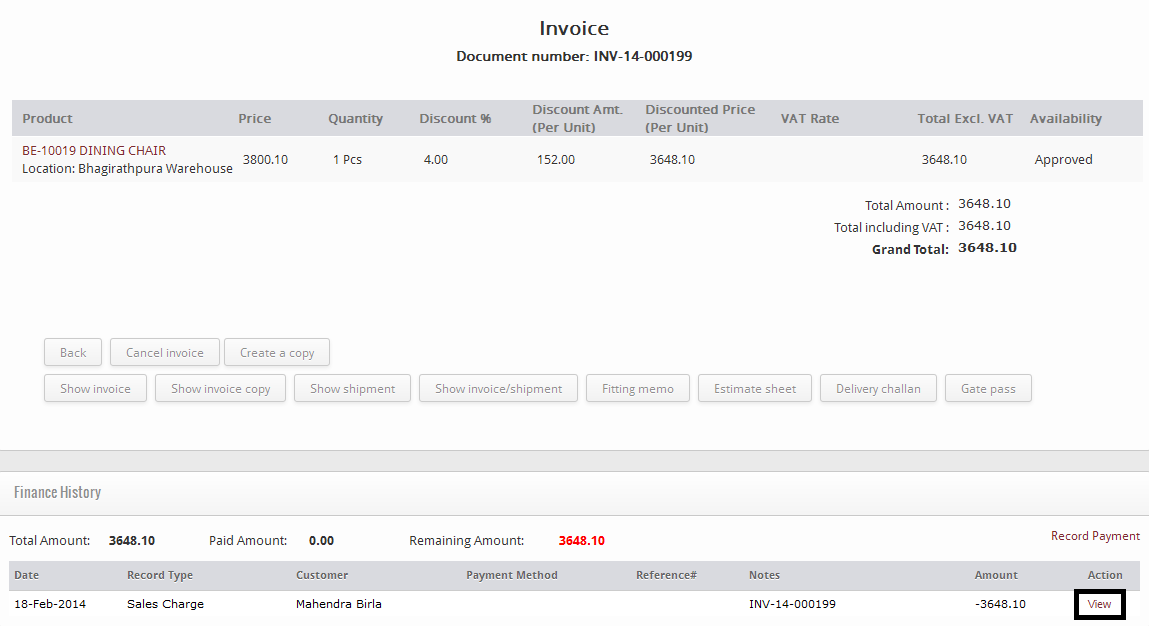
After you click on the “View” Option, a page appears that shows you the detailed payment against the invoice that you have created.